We made our Summer Patio Project deadline (just barely), with no help from Mother Nature. My last post (May 4) showcased our container garden project and the excavation of the patio area. I had hoped that the next weekend would see the completion of the project–but Mother Nature did not cooperate. That weekend, Mother’s Day weekend, was miserable here in the Chicago area. However, that Friday, we did have 400 bricks delivered, along with too much sand (double-check that math, folks), and a fantastic underlayment that eliminated the need for heavy crushed gravel. Instead of the gravel, we* used Brock’s 36″ x 24″ interlocking paver base panels (1-1/2 boxes). Everything arrived on 3 pallets from Menards, right before our wet weekend. That missed weekend allowed us just one working weekend before Graduation.
Fortunately for us, the weekend of May 16-17 was sunny and dry. Even if it was the hottest and most humid weekend since last September, we used each hour of the day to our advantage. Prior to the weekend, Teenager #1 had dug out 3-1/2″ near the house and graded the dig to 5-3/4″ in the northwest corner of the patio, the direction we wanted water to flow. On Friday, we moved the bricks and sand from the alley. Neighbor #1 was kind enough to help us on Saturday.
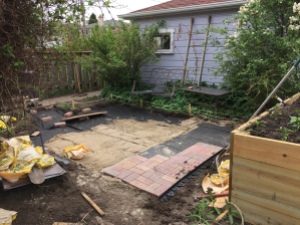
Above, you see the different layers of the patio as of noon on Saturday. The bottom layer is the landscape fabric. Before laying it, we took turns tamping the ground. The dogs had done a great job of compacting the dirt during the week by just running around on it, so the manual tamping wasn’t awful at all. Landscape fabric blows around pretty easily, so be sure to weigh it down with some bricks.
The next layer is 1″ to 1-1/2″ of sand, depending on the level of the compacted dirt. As we went, we developed a system that allowed multi-tasking:
1. My spouse used a 2 x 4 to smooth and level the sand.
2. After he finished leveling an area of sand, he laid down the underlayment. In the photo, you can see it stretching out from the bricks toward the garage. Using the underlayment, we could also easily tell what areas weren’t perfectly level and backfill with more sand, or remove sand if needed. Teen #2 helped cut the underlayment to size with his pocket knife. We recommend having an Exacto knife on hand to help cut the underlayment. It cuts better with an Exacto and not at all with scissors.
3. After my spouse put down the underlayment and the leveling was satisfactory, I laid the bricks in a classic two vertical / two horizontal pattern. The hardest was the first row, since that set the direction for all other rows. A leftover 2″ x 4″ x 8′ from the container garden was useful for making sure that the first set of bricks was plumb along the side running from the house (east) to the garage (west).
4. While I was laying bricks and the spouse was doing his tasks, Teen #3 delivered bricks from the pile to the patio. When I caught up with the supply, we hefted them from the pile together. Each brick weighs 5 pounds. Moving them from our brick pyramid by the house to the patio and then placing them, helped me lose a good 4 pounds of body weight that day, as well as much of the skin on my knees (I suggest wearing capris or jeans).
5. After the first couple of east-west rows were set, we all took turns adding the edging and pounding in the stakes. Husband was in charge of cutting the edging to size. He also helped cut the underlayment.
By 4:30pm that day, our patio was nearly finished (and so were we). We probably should have paid more to hydration than we did. But who pays attention to drinking enough water in May in Chicago?
Here is what it looked liked:
You can see the chair where we took turns collapsing in 90% humidity. All that was left was to finish the edging on the staggered path and apply on the polymetric sand (locking sand).
6. My husband took that Thursday off to finish the edging and add the locking sand. His suggestion to all who do this themselves: wear a mask. He didn’t and coughed all night.
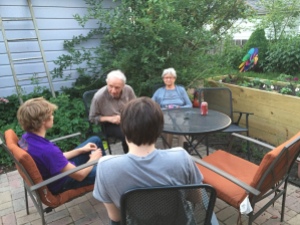
 The first party on our new brick patio was Friday, May 29, in honor of our daughter’s high school graduation. We finished the mulch, planters, and some perennials right in the nick of time.
Despite the continual forecast for severe storms, we lucked out and had beautiful weather. We’re pretty sure everyone had a great time, and we received wonderful compliments on the patio.
*We: 2 adults and 2 teenagers, with a sporadic appearance from one other teenager (the graduate). My mother also helped with the frantic, last minute plantings.


You must be logged in to post a comment.